Showing posts with label re-purpose recycle reuse. Show all posts

A New-ish Bath Mat

Scraps from the discontinued, designer fabric samples that my cousin pulled from the trash at the furniture store she worked at, and passed on to me.


An old towel for the back attached stitch in the ditch style and, store bought binding around the edge.


 Pulled from the trash and now used to catch the drips from little toes.

The Kiddie Kitchen

This past Christmas, I sorta gave my husband an ultimatum, Santa needs to build something cool, or I'm buying her this because my sweet baby girl has asked for nothing since we moved to this house (and got rid of the broken, 10 yr old, plastic one) except for her very own kitchen.


Well, Santa, could not have us spending money we don't really have and she was really, really good this year. He sure is amazing, that Santa, with all the other work he's gotta do, you know, besides the Santa-ing, he really must be magic to have pulled this off.


And, I know for a fact, that he worked on this late at night, in a cold garage. It's perfect. And, she absolutely loves it.

So, the details.
  • The base was rescued from the discounted, damaged or returned cabinet pile at a local cabinet supplier. (Santa told me all about it, he knows how we like re-purposing things headed for the heap.)
  • One door was turned and a handle added for the stove. A ledge of wood scraps installed around the inside supports a cookie cooling rack for the oven rack. 
  • A piece of oak routered and stained to match was placed on top, we originally thought we wanted it painted, to look like a counter top, but all that wood is just too pretty.
  • Real stove knobs that actually turn, magic I tell you, and foamy, sticky tape finish off the stove top.

  • Custom, Santa built, shelving stained to match was attached to the back of the cabinet, extending above, to hold all the pretty little pots, pans and dishes. 
  • The sink is a thrifted, stainless steel bowl that, my girl discovered Christmas morning, actually holds water so, I covered the entire thing with some of our leftover oil and beeswax mixture to save it from water stains. She doesn't seem to mind the missing faucet so, for now, it'll stay like this.

  • The legs are store bought and add just the right amount of height for our growing 4 year old and her big brother and sisters.

The Secret Agent Spy Kit

This handmade, or rather hand assembled gift was my favorite. For my niece, the one who loves handmade, and her little brother we put together a spy kit.


The kids and I had so much fun finding trench coats, hats and sunglasses at thrift stores, and Pop pop's closet. Then, while taking the youngest on an emergency potty stop at the back of one of the stores, we happened upon the most perfect old suitcase. It even had a secret compartment!


It wasn't priced and the nice lady working in the store gave it to us for under $3.00. A steal, and perfect for all the gear. We hid our own secret missions in that compartment along with some purchased spy gear from Target.


I made a couple of felt mustaches and we printed some badges from the FBI's website for kids, added the directions and parts needed to make their very own periscope and, finished it off with a book full of fun ideas for kids wanting to be experts in the spy business.


I've heard that the spy games are a new favorite at my sister's house and rumor has it, the secret agents have even started recruiting the youngest members of the family.


The Knight Costume Tutorial

"This would make a perfect tunic Mom! Can we make this into a tunic? Now!?" He says to me. I look up from the story I'm reading his little sister. He's holding a brand new pillow case from my new sheet set up to his chin as if it's a shirt he's considering wearing.

Wow, I think, he's right. "OK," I say, "but, not that pillowcase."


I'm always surprised at the things this boy comes up with, I never would have thought of turning an old pillowcase into a knight's tunic. This is his tutorial.
You will need:
  • A Pillowcase
  • Cardboard box
  • Fabric scraps
  • (Mommy note, you may also need some tin foil, heavy duty scissors or utility knife with parental supervision and a shield pattern to trace)
Pillowcase Tunic
Find a pillowcase and ask your mom if you can cut it up. Cut a hole for your head. Fold the pillowcase in half and then snip (gesturing with fingers snip snip snip)

Cut the arms. Fold again and snip just like the head. Cut the leg flaps
(Mommy note: If this will be used for dress up play after Halloween you may want to zigzag or serge around the raw edges so they won't fray or rip further.)

Shield Decoration
Take 2 pieces of fabric and cut them in the shape of a shield.
Then you take a sewing machine and sew the shield together. (Mommy note: right sides together, like a pillow, leave an opening or use some fusible webbing to create an iron on shield that wont fray).

Flip it right side out and then push your fingers so you have nice sharp edges. Well, they won't be that sharp, but they'll still be sharp.
Then, you put a dragon on it. You can color one with fabric markers if you want. If you don't, sew the dragon on with fabric (applique).

The original dragon sketch
And then sew the shield on (to the tunic). Be careful not to sew the back and front together.

The Helmet

Take a cardboard box and make sure it is not too fat.
Make the eye holes. Put the helmet on and mark the spot for the eyes, take scissors and cut eye holes and it might be a little hard. If it's too hard use sharper scissors. (Mommy note: ask for mom or dad's help)
Put tin foil on it and then you poke the eye holes through the tin foil.

Finish it off
Add a belt.
Yell out loud. AAAHHHH!

Kitchen Table Makeover

The "new" table
Before we moved, our kitchen table was in pretty bad shape. I would do everything I could to hide the mess that it had become and I cringed every evening when I tried to scrape off the mess from the day. Table cloths could only do so much and never stayed put anyway.

Kitchen table before
It is a nice sturdy table from a discount furniture store but, it is basically laminated plywood, so sanding and refinishing was out of the question. And the finish was peeling off in messy flakes creating grooves and gouges in the surface, so we couldn't just paint it either, at least not the top.

Kitchen chairs prepped for paint
Buying a new table was not even close to being in the budget anytime soon, but I just could not take it any longer. I decided we had to do something. I had seen my hubby and brother-in-law build a counter top for a kitchen remodel, and wondered if it would be possible to use the same technique to recover our table top.

Oooh so nice, no flaking finish
 As it turns we could! I sanded and painted the chairs and legs of the table while my sweet man glued the laminate counter top material right over that ugly tabletop. He added a piece of wood to make a nice edge all around, cut the laminate to fit, and used the router to spiffy it up.

No marker yet has defeated this tabletop
 Now we have a table that comes clean easily and looks so much better. And when the time comes for a new one, this will be an excellent craft table, because nothing the kids put on this table sticks.

Cowboy Vest Tutorial

Howdy Pardner! The discovery of some long lost toys after cleaning the basement, has spurred a new interest for my son. Cowboys! We have borrowed books from the library about the rodeo, watched clips from old westerns with Daddy, learned about how cowboy hats are made, and then, we just had to have a cowboy costume of our very own.
Now we share our fairly simple vest with you here.
 You'll need,
  • An old pair of  pants you don't want any more.(or any other cowboy vest like fabric)
  • A t-shirt, tank top or vest, that fits the vest wearer well, to trace.
  • Matching thread.
  • Tracing pen or pencil.
  • Fabric Scissors.
If your pants haven't been used for another project already, like mine, you should be able to use a side seam as the seam in the middle back of the vest. Use the t-shirt as a guide for the vest. Pay particular attention to the neck line and arm holes. I traced the arm holes at the seam where the sleeves are attached with a pencil first, making dots as I lifted the sleeve, then cut along the dotted line.
 You need to do this for the front and back, folding the shirt one way then the other to trace it, since the neckline for the front and back are different.
Now, sew the two back pieces together, if you weren't able to use the side seam of your pants. Then you sew the side seams of the vest from the armholes, down. Your vest is basically done here, you can try it on and make any adjustments.
To make fringes make a small zigzag around the armhole where you want the fringes to stop then snip snip snip. You can make more fringes in the same way on the bottom and around the front and neck of the vest if you want.  Or attach ribbon that is fringed like this.

The front may require some shaping since we traced it from a t-shirt meant to be closed all the way to the neck. Just trim away a nice curve from the front middle to the shoulders to make it lay flat. I had my son put the vest on then just cut away along the line that the fabric folded at. (Um, it's probably safer to mark the line then take off the vest to cut it, I don't want to be responsible for any boo boo's.)
My son wanted all fringes removed so I cut them off the arms and rolled all raw edges under then I used a decorative stitch to hem them.
And there you have it, the 6 Berries Cowboy/Cowgirl Vest (because of course little sissy will be needing one soon, maybe pink, definitely fringed.)

A quick update: My son has since moved on to dinosaurs, as I mentioned before. Wouldn't you know it, I actually invest a little time into a costume and today, I have to beg him to try it on for one last photo shoot. The mustache was all it took to convince him though. I made it out of felt and a piece of soft elastic last year and it just goes so well with this cowboy outfit. Don't you think?

Happy 2010!

My camera is MIA, left at my brothers after an exciting holiday visit including lots of sledding, yummy hot cocoa, board games and little ones staying up way too late. But I just couldn't leave those Christmas bags up any longer so I thought I'd show you a couple of things I'm considering for the new year.

I've never taken part in Amy Karol's Tie One On, but it always looks like so much fun. The theme this time is black and white and I have been planning a black and white apron for months. Now I have some extra motivation and a deadline to make it.

This sounds like another way to motivate myself to do some things I've been wanting to. Hip Mountain Mama is challenging readers to make one change each month from January 1st to April 22 (Earth day) that will have a positive effect on the environment. There are a lot of things I've been wanting to start doing and have just not been motivated to implement them. Maybe joining this group will help me get started.

I also have great plans to be more organized this year and have started by giving myself a quit housework and start sewing time so that I can have some items to sell in my shop soon (only a year after opening, sigh). I have also given myself a quit working and go to bed time so I can wake up and get the girls off to school with only minor whining (from me, not the girls). I have been working out some exciting plans to help my kids get involved in the housework and complete some of their chores with less nagging from me and Daddy. I hope to be able to share this here after it's been thoroughly tested. We'll see how this all works out, I've learned by now that any hard set rules, plans and schedules are soon challenged by the ever changing needs of kids and family, but I hope to have allowed enough flex time to accommodate most of the unexpected situations sure to arise.

Don't misinterpret my impatience to remove the holiday bags from the top of this blog as a rush to get past all the holiday crafting. I have plenty of show and tell and as soon as the camera is back in my possession and the pics have been downloaded, I'll have some fun stuff for you. For now though, it's all planning for the new year. What are your plans?

Scrappy Scarves

My brother, the one who gave me the trunk, has been asking me for years, literally, to make him a scarf. I think he has given up on me ever making him one because, the last few requests have been for just a piece of fleece to match his coat. Well, this year for his birthday I decided it was high time he had that scarf, and it would not be just a chopped up piece of fleece, no, he has been waiting years for this scarf so it had to be a little more special.

Old Pants! Yup, way more special than chopped up fleece right? (well not those exact pants, but aren't those little feet too cute?) By now I think you know how much I love to re-purpose, recycle and reuse, who doesn't these days really. I had been saving a pair of pants that didn't make it through more than two washes before falling apart at the pocket (I'm so bad at returning things or making complaints when I really need to.) and a pair of soft corduroy pants that no longer fit, but I just couldn't part with.

When I put the two together I couldn't resist the texture and pattern combination, It was perfect! I started cutting and sewing and before I knew it I had a really cool, really long scarf for my oh so patient brother.
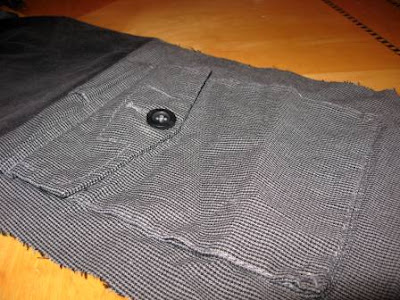
I had the front complete before his birthday party, mid October, and was confident I could attach that fleece he'd asked for, to the back and have it to him the next day for his actual birthday. When I got to the project the next day I realized the amount of black fleece I had left was far to short to work, darn those tall people and their long scarves.

So I whipped up a shorter, matching, scarf with the scraps, used the fleece I had on hand and gave that to my somewhat shorter brother-in-law for his birthday. It's hard to tell from the photo, but for this one, I used the angled cuts left behind from the pant's seams and the cuts I made for my brother's scarf so this one has a much more patchworky feel I thought I wouldn't like as much as the clean straight lines of my brothers, but it actually turned out pretty neat.

My poor brother has waited another month now for that scarf of his and last night I finally got the fleece to finish it, my goal is to have his birthday gift to him before my birthday this week. Can I pull it off, all while entertaining 4 young-uns, finishing craft gifts for the Thanksgiving gift exchange at my in-laws and cleaning the house for the potential holiday company that could overflow from my mom's to our house? I love a challenge.